
How to test ads
1. SDK Integration Verification
Note: Do not include this API in the build submitted for review, as it may affect the review.
ATSDK.integrationChecking(applicationContext);//Check whether the SDK integration of each ad platform is normal based on the output logs.In Logcat, filter with the Tag anythink to view the logs. Pay attention to whether the Status field under each ad platform is Success. If it is Success, that ad platform is correctly integrated; otherwise, the integration is incorrect and you need to examine each parameter specifically to make the corresponding modifications and supplement the missing integration parts.
The log output example is as follows:
********************************** Network Integration Status *************************************
----------------------------------------
NetworkName: GDT //Name of the mediated ad platform
SDK: VERIFIED //Verifies whether the Mediation SDK is correct. Displays VERIFIED if correct, otherwise NOT VERIFIED.
Dependence Plugin: VERIFIED //Verifies whether the plugin that the ad platform depends on exists. Displays VERIFIED if correct, otherwise displays the missing configuration.
Activities : VERIFIED //Verifies whether the ad platform's Activity declaration exists. Displays VERIFIED if correct, otherwise displays the missing configuration.
Providers : VERIFIED  //Verifies whether the ad platform's Provider declaration exists. Displays VERIFIED if correct, otherwise displays the missing configuration.
Status: Success //Verifies whether the ad platform is fully integrated correctly. Displays Success if correct, otherwise displays Fail.
----------------------------------------
NetworkName: Baidu
SDK: VERIFIED
Dependence Plugin: VERIFIED
Activities : VERIFIED
Services : VERIFIED
Providers : VERIFIED
Status: Success
********************************** Network Integration Status *************************************
2. SDK Log Switch
Note: The log feature must be turned off before the app goes live.
ATSDK.setNetworkLogDebug(true);After enabling the log feature, you can obtain the test device ID:
- Open Android Studio's Logcat, filter with "anythink" as the tag, and view the SDK logs.
- The following log will be printed when the Taku SDK is initialized. You can obtain the device ID from the log.
anythink: ********************************** UA_5.9.96 *************************************
anythink: OAID: ef7e0bcaf130b9b0 , AndroidID: f669f2b7137d82b9
anythink: ********************************** UA_5.9.96 *************************************
Log Example:
anythink_network:
╔═══════════════════════════════════════════════════════════════════════════════════════
║ {
║     "placementId": "b5bbdc725768fa",  //The ad placement ID that initiated the load.
║     "adType": "inter",  //The ad placement type that initiated the load.
║     "mixedFormatAdType": -1,
║     "action": "request_result",  //Action after initiating ad loading: request (ad request), request_result (ad request result), impression (ad impression), click (ad click), close (ad close).
║     "refresh": 0,
║     "result": "fail",  //Result parameter, success or fail.
║     "segmentId": 0,  //(Added in v5.7.7) The traffic group where the current Ad Source belongs. 0 indicates the default group.
║     "adSourceId": "1423289",  //Ad Source ID.
║     "position": 0,  //The sorting position of the current Ad Source under the Ad Placement.
║     "networkFirmId": 6,  //Taku's unique ID used to distinguish third-party ad platforms. See the mapping at (https://help.takuad.com/docs/2KR6QU)
║     "networkName": "Mintegral",  //Ad platform name.
║     "networkVersion": "MAL_16.1.41",  //Ad platform SDK version.
║     "networkUnit": "{\"is_video\":\"0\",\"video_muted\":\"0\",\"suport_video\":\"1\",\"appkey\":\"ef13ef712aeb0f6eb3d698c4c08add96\",\"unitid\":\"1726152\",\"appid\":\"100947\"}",  //Configuration of this Ad Source in the TopOn dashboard (corresponds to the third-party ad platform's app and placement info).
║     "isHB": 0,//Whether the Ad Source is a Header Bidding Ad Source.
║     "msg": "code:[ 4001 ]desc:[ Return Ad is empty. ]platformCode:[  ]platformMSG:[ EXCEPTION_UNIT_ADTYPE_ERROR ]",  //If loading fails, the complete error information will be output here.
║     "hourly_frequency": 0,  //Number of times displayed in the current hour.
║     "daily_frequency": 0,  //Number of times displayed in the current day.
║     "network_list": "6,6,6",  //The IDs in the current third-party ad platform request list, separated by ",".
║     "request_network_num": 1,  //Indicates how many third-party ad platform Ad Source loads are initiated simultaneously (corresponds to the parallel request count in the Taku dashboard Advanced Settings).
║     "handle_class": "com.anythink.network.mintegral.MintegralATInterstitialAdapter"  //The class name that calls the ad platform API.
║ }
╚═══════════════════════════════════════════════════════════════════════════════════════
Note:
- If the result field of all action type logs is success, then the ad platform is integrated normally.
- If the result field of a certain log is fail, it indicates that an error occurred in that ad behavior. You need to check the content of the msg field in the log, with the following format:
"code[ " + code + " ],desc[ " + desc + " ],platformCode[ " + platformCode + " ],platformMSG[ " + platformMSG + " ]"

code: Taku SDK's internal error code.
desc: Taku SDK's internal error description.
platformCode: The third-party ad platform's error code (the error code to check when no ad fill occurs).
platformMsg: The third-party ad platform's error message (the error message to check when no ad fill occurs).
You can look up the relevant Taku Error Code based on code and desc. If code=4001, you need to check Third-Party Ad Platform Error Codes & FAQ based on platformCode and platformMSG for troubleshooting.
3. Testing Ads Using the Test Tool
3.1 Test Tool Introduction
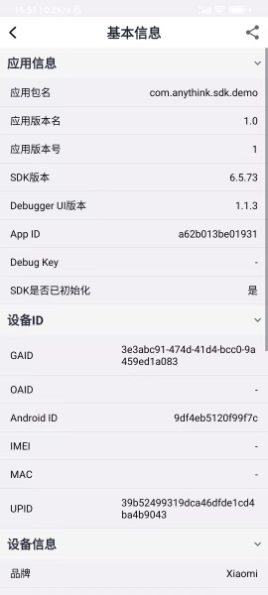
- Basic Info: Check app, device, and SDK related information.
- Taku SDK Settings: Check whether privacy settings and permissions are successfully configured.
- Integration Check: Check the integration status of third-party platform SDKs and Adapters, testing suggestions, and test ad loading for third-party ad platforms.
Note:
- Supports use for checking after integrating the Taku SDK.
- The test tool is only for checking SDK integration and cannot replace the app's own ad logic testing.
- After testing is complete and before the app goes live, the code that calls the test tool must be deleted.
- SDK version requirement: v6.2.70 and above.
- Friendly Reminder: Custom Adapter only supports the online ad placement testing feature; other features are not supported.
● Version Notes
| Taku SDK Version | Test Tool Version | Description |
|---|---|---|
| v6.6.21 and above (Recommended) | v1.1.6 | Adapted to higher SDK version, optimized known issues. |
| v6.5.50-6.6.21 below (Recommended) | v1.1.3 | Adapted to higher SDK version, optimized known issues. |
| v6.2.70-6.5.50 below (Recommended) | v1.1.2 | Adapted to higher SDK version, optimized known issues. |
💡Tips: When testing with the test tool, pay close attention to the following:
- Check whether the ad platform's SDK integration display is correct.
- Check whether the request, impression, and click for each ad platform's formats are normal.
3.2 Test Tool Integration
(1) Refer to the Taku SDK Integration Guide to integrate the SDK.
(2) Import the test tool by adding the reference in build.gradle:
repositories {
    maven {
        url "https://jfrog.anythinktech.com/artifactory/debugger"
    }
}
dependencies {
    //Debugger UI Tools,Refer to the release notes above to replace the version number—for example, 1.1.3
    implementation 'com.anythink.sdk:debugger-ui:${version}'
}
(3) Launch the test tool:
Note: You must first Initialize the Taku SDK, then call the following method to use the test tool.
ATDebuggerUITest.showDebuggerUI(context);3.3 Test Tool Usage
3.3.1 Basic Info
3.3.2 Taku SDK Settings
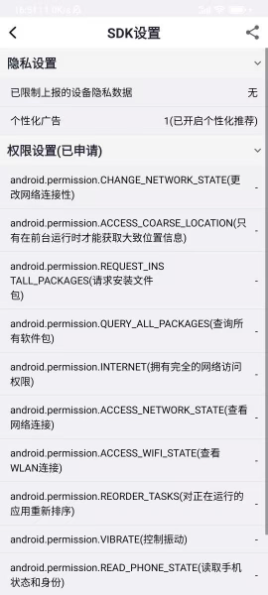
Taku SDK Settings consists of two parts: Privacy Settings and Permission Settings.
(1) Privacy Settings
Restricted device privacy data reporting
(2) Permission Settings: The list of permissions requested by the app.
3.3.3 Integration Check
(1) View the integration status of the ad platform list: Integration Issue, Integration Complete, Not Integrated.
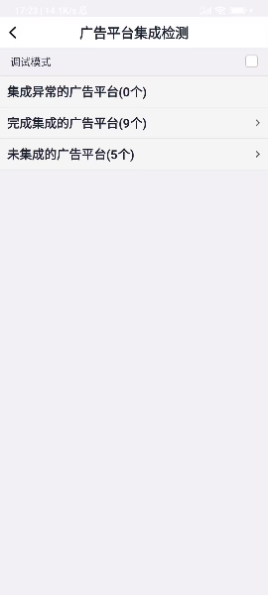
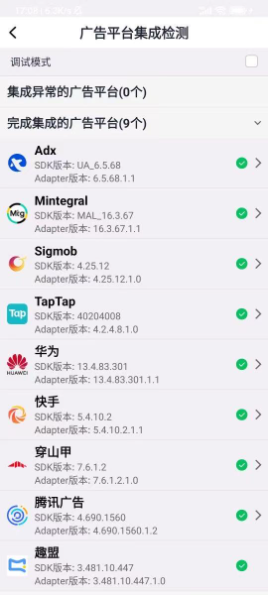
(2) Check the switch to enable debug mode.
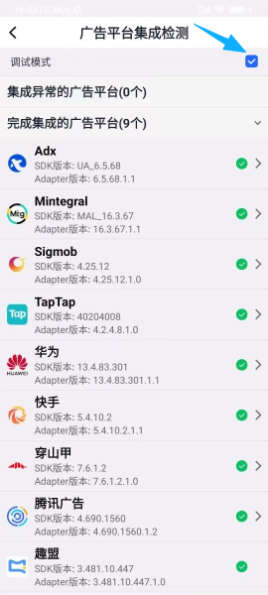
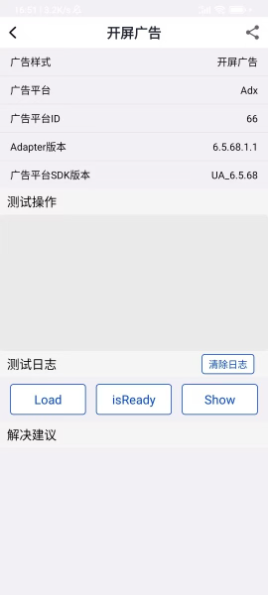
(3) Select an ad platform to enter debug mode, and click the share button in the top right corner to share the ad platform information of the current page.
(4) Select the ad platform's ad format for testing operations.
3.3.4 Online ID Testing
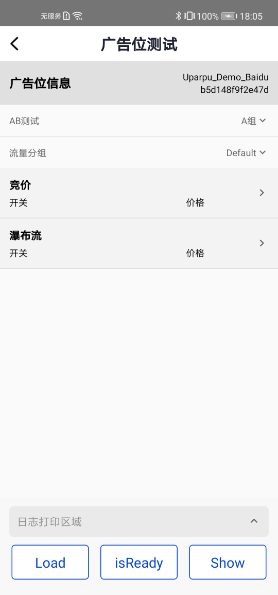
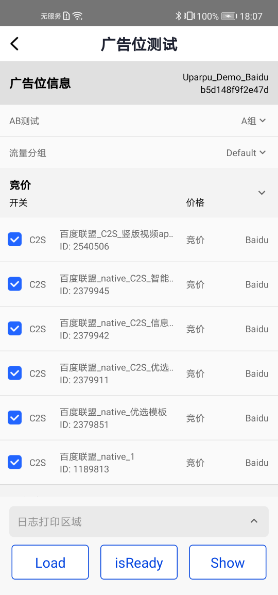
Online ID Testing supports testing ads using the Ad Placements configured in the Taku dashboard, and supports filtering Ad Sources under the Ad Placement for testing.
Note: After running Online ID Testing, if you switch back to testing within the developer's app, you need to restart the app to avoid cache issues caused by the in-app test Ad Placement being the same as the test tool's Ad Placement.
(1) Prerequisites
- SDK Version: v6.3.68 and above.
- Test Tool Version: v1.0.5 and above.
- Set SDK Debug Key: The steps to obtain it are:
Log in to the Dashboard->Account Management->Key->SDK Debug Key. - Debug mode is in the off state.
(2) Get Started
Sample code:
//1. Initialize SDK
ATSDK.init(context, "your app id", "your app key");
//2. Set Debug Key to enter the test tool
ATDebuggerUITest.showDebuggerUI(context, "your debug key");
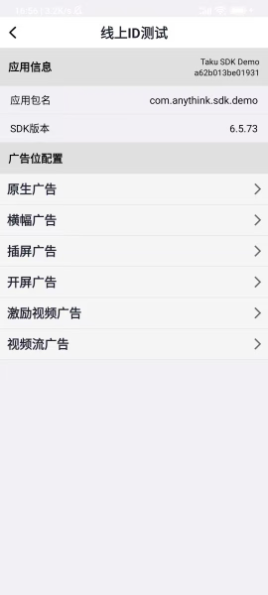
(3) Online ID List
- Supports viewing app information: App name, App ID, App package name, SDK version.
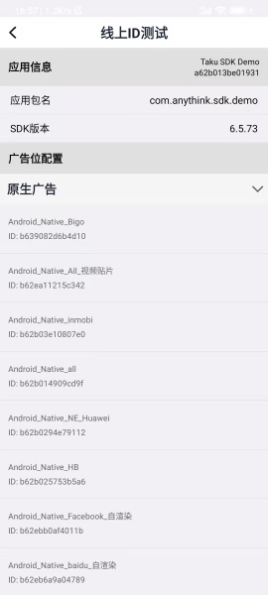
- Supports viewing the list of Ad Placements configured under the app.
- Supports viewing Ad Placement information: Name, ID.
- Supports clicking on an Ad Placement to navigate to the Ad Placement Testing page for testing (VAST/VMAP Ads are not currently supported for testing).
(4) Ad Placement Testing
- Supports switching traffic groups.
- Supports bidding and waterfall Ad Sources.
- Supports filtering Ad Sources: Unchecked Ad Sources will be filtered when initiating a load.
4. Testing Ads via Debug Mode
(1) Using debug mode, you can lock onto a single ad platform and use the test Ad Sources pre-configured by Taku to test and verify the ad platform integration.
(2) After testing begins, first enable the SDK's log feature and obtain the test device ID. Then call the API for each ad platform, configure the test device, test ad platform, and test ad type, and enable debug mode. Finally, based on the log output results, make the corresponding adjustments.
(3) Each ad platform has its own specific method, and different ad formats have different parameter configurations. Please select the method to call based on the ad platform and ad format you need to test. For the ad formats supported by each ad platform, refer to: Mediation Platform Overview.
(4) We recommend calling the API to configure before Taku SDK Initialization.
(5) After configuration is complete, all Ad Placements on the test device will only request test Ad Sources of the ad platform specified in the configuration.
Note:
- For Bidding Ad Sources, this configuration only supports Taku ADX. Other Bidding Ad Sources cannot be tested using this method.
4.1 Ad Platforms Supported by Debug Mode
4.1.1 China Platforms
● Mintegral
// General Settings
ATSDK.setDebuggerConfig(context, AndroidID, new ATDebuggerConfig.Builder(Mintegral_NETWORK) .setInterstitial(Mintegral_INTERSTITIAL_VIDEO).build());
// Advanced Usage
ATSDK.setDebuggerConfig(context, AndroidID, new ATDebuggerConfig.Builder(Mintegral_NETWORK).setNativeType(nativeType).build());
Parameter Description:
nativeType: Set Native Ad type, supports the following types:
    Mintegral_NATIVE_SELF_RENDER: Native Custom Rendering
    Mintegral_NATIVE_TEMPLATE: Native Auto Rendering
● GDT (Tencent Ads)
// General Settings
ATSDK.setDebuggerConfig(context, AndroidID, new ATDebuggerConfig.Builder(GDT_NETWORK).build());
// Advanced Usage
ATSDK.setDebuggerConfig(context, AndroidID, new ATDebuggerConfig.Builder(GDT_NETWORK).setNativeType(nativeType).setInterstitial(interType).build());
Parameter Description:
GDT_NATIVE_TEMPLATE: Platform Template Rendering
GDT_NATIVE_SELF_RENDER: Developer Self-Rendering
GDT_NATIVE_DRAW_TEMPLATE: Video Patch Ad (Template Rendering)
GDT_NATIVE_DRAW_SELF_RENDER: Video Patch Ad (Self-Rendering)
interType: Set Interstitial Ad type, supports the following types:
GDT_INTERSTITIAL: Popup Video
GDT_INTERSTITIAL_FULL_SCREEN: Full-Screen Video
● Pangle (China)
// General Settings
ATSDK.setDebuggerConfig(context, AndroidID, new ATDebuggerConfig.Builder(TT_NETWORK).build());
// Advanced Usage
ATSDK.setDebuggerConfig(context, AndroidID, new ATDebuggerConfig.Builder(TT_NETWORK).setNativeType(nativeType).build());
Parameter Description:
nativeType: Set Native Ad type, supports the following types:
TT_NATIVE_TEMPLATE: Info Feed Ad + Template Rendering
TT_NATIVE_SELF_RENDER: Info Feed Ad + Self-Rendering
TT_NATIVE_DRAW_TEMPLATE: Draw Info Feed Ad + Template Rendering
TT_NATIVE_DRAW_SELF_RENDER: Draw Info Feed Ad + Self-Rendering
● Baidu
// General Settings
ATSDK.setDebuggerConfig(context, AndroidID, new ATDebuggerConfig.Builder(BAIDU_NETWORK).build());
// Advanced Usage
ATSDK.setDebuggerConfig(context, AndroidID, new ATDebuggerConfig.Builder(BAIDU_NETWORK).setNativeType(nativeType).setInterstitial(interType).build());
Parameter Description:
nativeType: Set Native Ad type, supports the following types:
BAIDU_NATIVE_SELF_RENDER: Self-Rendering
BAIDU_NATIVE_TEMPLATE: Template Rendering
interType: Set Interstitial Ad type, supports the following types:
BAIDU_INTERSTITIAL_FULL_SCREEN: Full-Screen Video
BAIDU_INTERSTITIAL_TEMPLATE: Template Interstitial
● Kuaishou
// General Settings
ATSDK.setDebuggerConfig(context, AndroidID, new ATDebuggerConfig.Builder(KS_NETWORK).build());
// Advanced Usage
ATSDK.setDebuggerConfig(context, AndroidID, new ATDebuggerConfig.Builder(KS_NETWORK).setNativeType(nativeType).build());
Parameter Description:
nativeType: Set Native Ad type, supports the following types:
KS_NATIVE_SELF_RENDER: Info Feed Ad + Self-Rendering
KS_NATIVE_TEMPLATE: Info Feed Ad + Template Rendering
KS_NATIVE_DRAW: Draw Info Feed Ad
● Huawei
// General Settings
ATSDK.setDebuggerConfig(context, AndroidID, new ATDebuggerConfig.Builder(Huawei_NETWORK).build());
// Advanced Usage
ATSDK.setDebuggerConfig(context, AndroidID, new ATDebuggerConfig.Builder(Huawei_NETWORK).setNativeType(nativeType).setInterstitial(interType).build());
Parameter Description:
nativeType: Set Native Ad type, supports the following types:
Huawei_NATIVE_VIDEO: Video
Huawei_NATIVE_IMAGE: Small Image
Huawei_NATIVE_BIG_IMAGE: Large Image
interType: Set Interstitial Ad type, supports the following types:
Huawei_INTERSTITIAL_IMAGE: Interstitial Image
Huawei_INTERSTITIAL_VIDEO: Interstitial Video
● Sigmob
// General Settings
ATSDK.setDebuggerConfig(context, AndroidID, new ATDebuggerConfig.Builder(Sigmob_NETWORK).build());
● Mimo
// General Settings
ATSDK.setDebuggerConfig(context, AndroidID, new ATDebuggerConfig.Builder(Mimo_NETWORK).build());
● YouKeYing
// General Settings
ATSDK.setDebuggerConfig(context, AndroidID, new ATDebuggerConfig.Builder(Klevin_NETWORK).build());
● ADX
String oaid = "<Enter the OAID of the test device as a static value. Do not dynamically obtain the current device's OAID, to avoid affecting live users.>";
String aid = "<Enter the AndroidID of the test device as a static value. Do not dynamically obtain the current device's AndroidID, to avoid affecting live users.>";

// General Settings
ATSDK.setDebuggerConfig(context, oaid, new ATDebuggerConfig.Builder(Adx_NETWORK).build());
// Advanced Usage
ATSDK.setDebuggerConfig(context, aid, new ATDebuggerConfig.Builder(Adx_NETWORK).setNativeType(nativeType).setInterstitial(interType).setBannerType(bannerType).build());
Parameter Description:
nativeType: Set Native Ad type, supports the following types:
    ADX_NATIVE_EXPRESS_LEFT_PIC_RIGHT_TEXT: Left Pic Right Text
    ADX_NATIVE_EXPRESS_LEFT_TEXT_RIGHT_PIC: Left Text Right Pic
    ADX_NATIVE_EXPRESS_TOP_PIC_BOTTOM_TEXT: Top Pic Bottom Text
    ADX_NATIVE_EXPRESS_TOP_TEXT_BOTTOM_PIC: Top Text Bottom Pic
    ADX_NATIVE_SELF_RENDER: Self-Rendering
interType: Set Interstitial Ad type, supports the following types:
    Adx_INTERSTITIAL_FULL_SCREEN: Full-Screen Interstitial
    Adx_INTERSTITIAL_HALF_SCREEN: Half-Screen Interstitial
bannerType: Set Banner Ad type, supports the following types:
    ADX_BANNER_SIZE_320_50: 320x50 size
    ADX_BANNER_SIZE_320_90: 320x90 size
    ADX_BANNER_SIZE_300_250: 300x250 size
    ADX_BANNER_SIZE_728_90: 728x90 size
4.2 Platforms Not Supported by Debug Mode
For platforms not supported by debug mode, you can use the Online ID feature of the test tool for testing.
- Based on the output logs, verify the Ad Sources. From the log output in Logcat, you can see the tracking of various ad actions.
- After calling the API to configure the test rules, you can start performing various ad actions.
- Based on
placementId, locate the Ad Placement that needs to be verified.
;}.cls-2{fill:%230868f7;}.cls-3{fill:url(%23未命名的渐变_44);}.cls-4{fill:%23333;}%3c/style%3e%3clinearGradient%20id='未命名的渐变_8'%20x1='33.73'%20y1='100.61'%20x2='-0.03'%20y2='-1.06'%20gradientUnits='userSpaceOnUse'%3e%3cstop%20offset='0'%20stop-color='%237ae9fb'/%3e%3cstop%20offset='0.67'%20stop-color='%232b90f8'/%3e%3cstop%20offset='1'%20stop-color='%230868f7'/%3e%3c/linearGradient%3e%3clinearGradient%20id='未命名的渐变_44'%20x1='27.86'%20y1='18.67'%20x2='68.36'%20y2='22.22'%20gradientUnits='userSpaceOnUse'%3e%3cstop%20offset='0'%20stop-color='%235ac7f2'/%3e%3cstop%20offset='1'%20stop-color='%230868f7'/%3e%3c/linearGradient%3e%3c/defs%3e%3cpath%20class='cls-1'%20d='M29,28.74V81.91l-9.51-3.68v0L8.52,74A7.17,7.17,0,0,1,4,67.32V24.54A3.76,3.76,0,0,1,9.08,21Z'/%3e%3cpath%20class='cls-2'%20d='M68.09,78.07a13.15,13.15,0,0,1-17.9,12.06L29,81.91h0V28.74L50.19,37A13.17,13.17,0,0,0,68.08,25.3h0Z'/%3e%3cpath%20class='cls-3'%20d='M68.08,25.3a13.19,13.19,0,0,1-6.73,10.87A13.09,13.09,0,0,1,50.19,37L29,28.74V6A3.76,3.76,0,0,1,34.1,2.52l25.59,9.91A13.22,13.22,0,0,1,68.08,25.3Z'/%3e%3cpath%20class='cls-4'%20d='M129.06,81.76a4.33,4.33,0,0,1-3.19-1.31,4.4,4.4,0,0,1-1.31-3.24V56.86H97.65V77.21a4.36,4.36,0,0,1-1.35,3.2A4.68,4.68,0,0,1,93,81.76a4.32,4.32,0,0,1-3.19-1.31,4.37,4.37,0,0,1-1.32-3.24V27.27A4.58,4.58,0,0,1,89.83,24a4.59,4.59,0,0,1,7.82,3.27V48.15h26.91V27.27A4.58,4.58,0,0,1,125.91,24a4.59,4.59,0,0,1,7.82,3.27V77.21a4.37,4.37,0,0,1-1.36,3.2A4.65,4.65,0,0,1,129.06,81.76Z'/%3e%3cpath%20class='cls-4'%20d='M163.77,81.66c-6.57,0-11.76-1.92-15.44-5.7s-5.54-9.07-5.54-15.74a26.76,26.76,0,0,1,2.09-10.43,17.72,17.72,0,0,1,6.67-8.06,19.15,19.15,0,0,1,10.68-2.95,19,19,0,0,1,10.46,2.8,18.7,18.7,0,0,1,6.55,7.36,22.53,22.53,0,0,1,2.36,10.28A4.51,4.51,0,0,1,177,63.77H152.23a10.8,10.8,0,0,0,3.49,6.65c2,1.68,4.88,2.52,8.66,2.52a22.25,22.25,0,0,0,7.54-1.21c.74-.3,1.55-.67,2.37-1.07a3.75,3.75,0,0,1,1.84-.4,4.09,4.09,0,0,1,3,1.15,4,4,0,0,1,1.12,3,4.38,4.38,0,0,1-2.58,3.82,32.34,32.34,0,0,1-6.36,2.61A28.67,28.67,0,0,1,163.77,81.66ZM172.4,55.9a9.72,9.72,0,0,0-1.63-4.56A9.9,9.9,0,0,0,167,48a10.38,10.38,0,0,0-4.64-1.14,12,12,0,0,0-4.77,1.06,9.54,9.54,0,0,0-4.89,5.66,11.78,11.78,0,0,0-.51,2.3Z'/%3e%3cpath%20class='cls-4'%20d='M193,81.64a4.49,4.49,0,0,1-4.51-4.55V27.28A4.58,4.58,0,0,1,189.84,24a4.48,4.48,0,0,1,3.28-1.36A4.36,4.36,0,0,1,196.35,24a4.46,4.46,0,0,1,1.31,3.31V77.09a4.34,4.34,0,0,1-1.35,3.2A4.67,4.67,0,0,1,193,81.64Z'/%3e%3cpath%20class='cls-4'%20d='M263.79,81.71a5.7,5.7,0,0,1-4.2-1.74,5.76,5.76,0,0,1-1.73-4.19V27.37a4.58,4.58,0,0,1,1.35-3.27A4.59,4.59,0,0,1,267,27.37V72.53h24a4.58,4.58,0,0,1,3.27,7.82A4.66,4.66,0,0,1,291,81.71Z'/%3e%3cpath%20class='cls-4'%20d='M424.48,81.74a4.71,4.71,0,0,1-2.71-.88,5.43,5.43,0,0,1-1-1l-.07-.09-12.41-17-5.41,5v9.44a4.31,4.31,0,0,1-1.36,3.19,4.66,4.66,0,0,1-3.3,1.36A4.29,4.29,0,0,1,395,80.42a4.36,4.36,0,0,1-1.32-3.23V27.37A4.58,4.58,0,0,1,395,24.1a4.52,4.52,0,0,1,6.58.12,4.54,4.54,0,0,1,1.24,3.15V56.31l17.72-16.38.05,0a4.8,4.8,0,0,1,2.94-1.11,4.4,4.4,0,0,1,3.27,1.2,4.57,4.57,0,0,1,1.2,3.27,4.44,4.44,0,0,1-.77,2.33,7.45,7.45,0,0,1-1.43,1.65l-11,9.64,13.34,17.68a5,5,0,0,1,1,2.71,4.12,4.12,0,0,1-1.36,3.24A4.64,4.64,0,0,1,424.48,81.74Z'/%3e%3cpath%20class='cls-4'%20d='M317.93,81.76a21.5,21.5,0,1,1,21.17-21.5A21.37,21.37,0,0,1,317.93,81.76Zm0-34.1a12.61,12.61,0,1,0,12.42,12.6A12.52,12.52,0,0,0,317.93,47.66Z'/%3e%3cpath%20class='cls-4'%20d='M212.18,101.22a4.12,4.12,0,0,1-3.05-1.26,4.17,4.17,0,0,1-1.26-3.1V43.34a4.37,4.37,0,0,1,1.3-3.14,4.26,4.26,0,0,1,3.13-1.3,4.19,4.19,0,0,1,3.1,1.26,4.32,4.32,0,0,1,1.26,3.16,20.77,20.77,0,0,1,13-4.54,21.51,21.51,0,0,1,0,43,20.51,20.51,0,0,1-13-4.57V96.86a4.15,4.15,0,0,1-1.3,3.06A4.5,4.5,0,0,1,212.18,101.22Zm17.43-53.63c-6.23,0-12.93,4.11-12.93,12.72a12.73,12.73,0,0,0,25.46,0A12.71,12.71,0,0,0,229.61,47.59Z'/%3e%3cpath%20class='cls-4'%20d='M365.76,81.76a21.5,21.5,0,1,1,21.18-21.5A21.37,21.37,0,0,1,365.76,81.76Zm0-34.1a12.61,12.61,0,1,0,12.42,12.6A12.52,12.52,0,0,0,365.76,47.66Z'/%3e%3c/svg%3e)