
Import and configure
1. Overview
Flutter version requirement: flutter: ">=2.12.0"
iOS SDK version requirements:
| Flutter SDK Version | iOS SDK Version |
|---|---|
| <= 1.0.8 | 6.4.93 |
| >=1.0.9 | 6.5.34、6.5.43 |
2. Account and Related ID Preparation
You can follow the Account and Related ID Preparation guide for account registration and login instructions.
3. Import Flutter SDK
See the Demo Flutter Demo Github (click to jump)
Two methods for importing the SDK are supported:
3.1 Import from pub.dev
1. Run the following command in the terminal command line: (Refer to https://pub.dev/packages/anythink_sdk )
flutter pub add anythink_sdkAfter running the command, the following code will be automatically added to the project's pubspec.yaml and trigger flutter pub get. You can also manually add the following code in pubspec.yaml:
dependencies:
  anythink_sdk: ^x.x.x
2. After successful, you can import the following header file and use it:
import 'package:anythink_sdk/at_index.dart';3.2 Manual Import
-
Download the AnyThink_Flutter_SDK compressed package and decompress it.
-
Add the decompressed files to your project. You can also import the decompressed files into a newly created directory.
-
Locate pubspec.yaml in the project and add the local dependency:
anythink_sdk:
path: ../- Import the header file in the class:
import 'package:anythink_sdk/at_index.dart';4. Import iOS SDK
4.1 Prerequisites
- The latest version of Xcode
- CocoaPods 1.15.2 or above installed
4.2 Locate the correct anythink_sdk.podspec file
- If you use pub.dev to import the Flutter SDK
- Import the header file and hover over the imported header file:
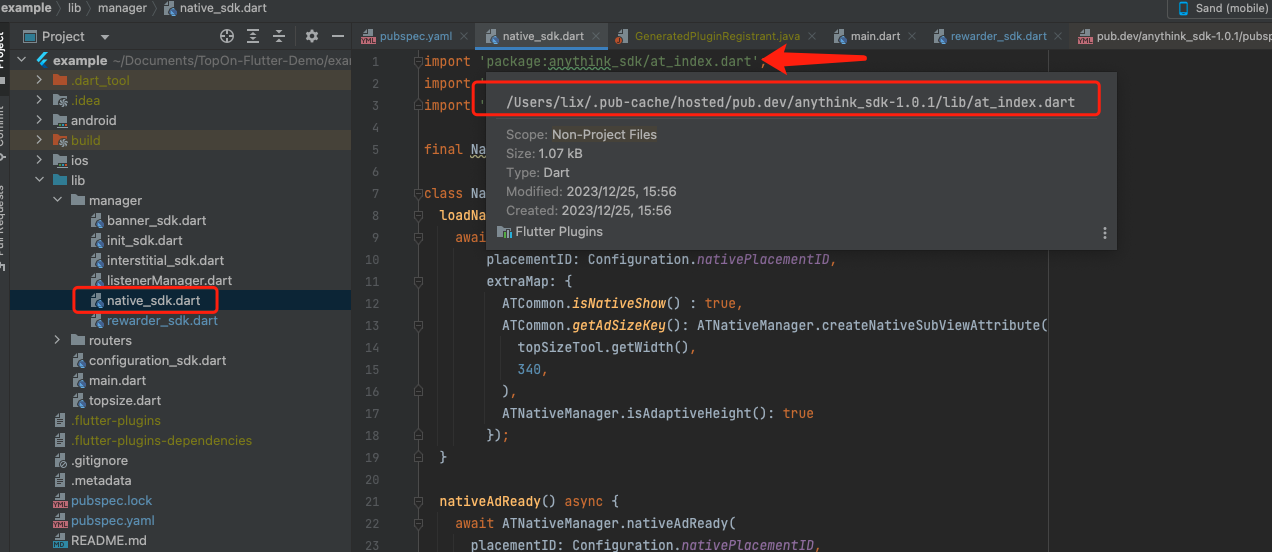
- Copy the address in the red box and use Finder to open it to find the location of anythink_sdk.podspec.
- If you manually import the Flutter SDK
The target file is the anythink_sdk.podspec file in your project directory.
4.3 Get iOS SDK Cocoapods Code
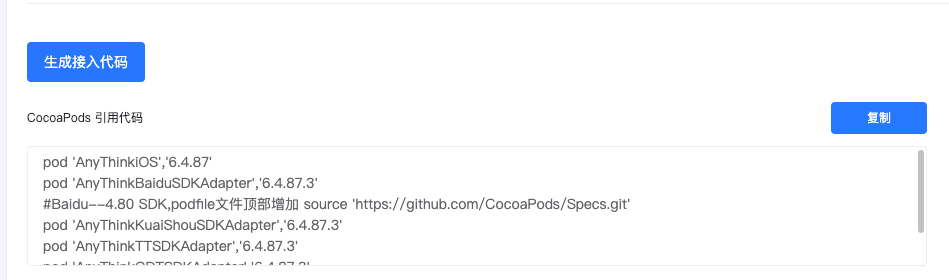
Please click here to go to the SDK Download Center, select the platforms you need to integrate, choose "Yes" for CocoaPods integration, and click Generate Integration Code. (Using iOS 6.4.87 as an example, it is recommended to use the latest version of the iOS SDK.)
4.4 Add iOS SDK Dependencies in the correct anythink_sdk.podspec
Convert the CocoaPods reference code generated in the previous step into the code required by the .podspec file, then fill it into anythink_sdk.podspec. The conversion before and after is as follows:
// Before conversion:
pod 'AnyThinkiOS','x.x.xx'
pod 'AnyThinkBaiduSDKAdapter','x.x.xx'
pod 'AnyThinkKuaiShouSDKAdapter',''x.x.xx'
pod 'AnyThinkTTSDKAdapter','x.x.xx'
pod 'AnyThinkGDTSDKAdapter','x.x.xx'


Simply replace pod with s.dependency

// After conversion:
s.dependency 'AnyThinkiOS','x.x.xx'
s.dependency 'AnyThinkBaiduSDKAdapter','x.x.xx'
s.dependency 'AnyThinkKuaiShouSDKAdapter','x.x.xx'
s.dependency 'AnyThinkTTSDKAdapter','x.x.xx'
s.dependency 'AnyThinkGDTSDKAdapter','x.x.xx'
4.5 Install iOS SDK
After writing anythink_sdk.podspec, use the terminal to open the iOS podfile directory and wait for the installation to complete. (If this is not the first time, you may need to delete podfile.lock before executing the command below.)
pod install --repo-update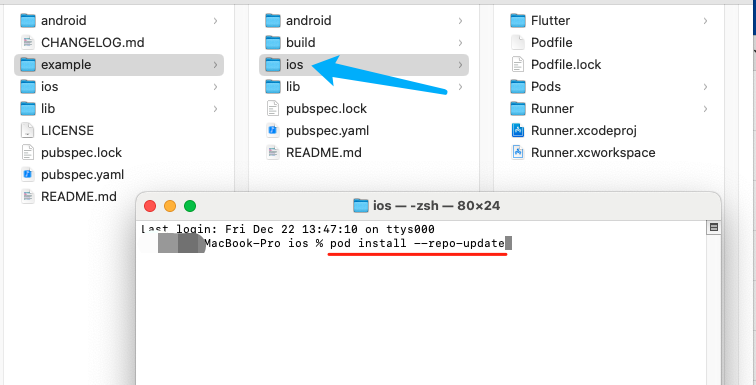
5. Configure iOS Project
5.1 Update Info.plist
5.1.1 Open Info.plist
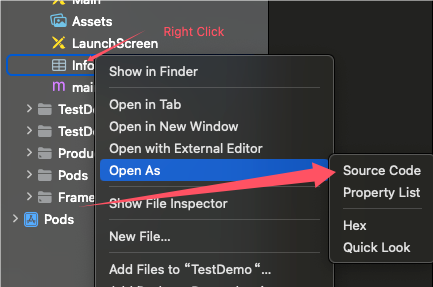
5.1.2 Add SKAdNetworkItems Key
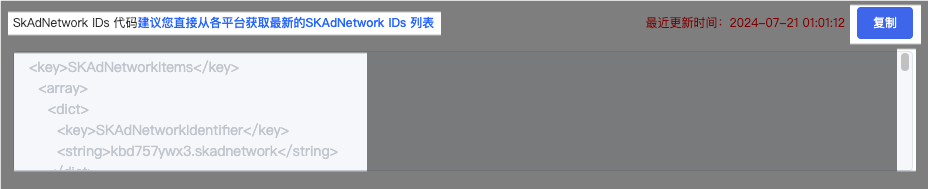
Please return to the "SDK Download Center" webpage opened above, and add the content listed in the "SKAdNetwork IDs Code" section to your Info.plist file. Refer to the image below:
5.1.3 Add LSApplicationQueriesSchemes Key
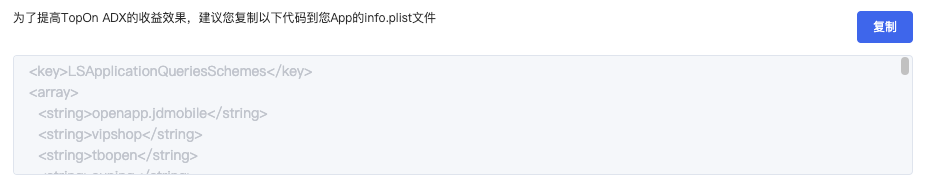
Please return again to the "SDK Download Center" webpage opened above, or directly copy the code below, and add the content listed in the following section to your Info.plist file. Refer to the image below:
5.1.4 Add NSUserTrackingUsageDescription Key
Starting from iOS 14.5, apps can access the user's IDFA data and serve targeted ads to users only after obtaining the user's explicit permission.
Before the app calls the App Tracking Transparency framework to make an app tracking authorization request to the end user, IDFA will be unavailable. If an app does not make this request, the read IDFA will return a string of all zeros.
<key>NSUserTrackingUsageDescription</key>
<string>Modify this to the permission request description you want users to see, can be localized</string>
5.1.5 Add NSAppTransportSecurity Key
After iOS 10, when the Allow Arbitrary Loads in Web Content key exists, it ignores the Allow Arbitrary Loads setting.
<key>NSAppTransportSecurity</key>
<dict>
	<key>NSAllowsArbitraryLoads</key>
	<true></true>
</dict>
5.1.6 AdMob Platform: Add GADApplicationIdentifier Key (Optional)
Only add this key if you have selected and are using the Admob platform. For more information, go here.
<key>GADApplicationIdentifier</key>
<string>Your GADApplicationIdentifier </string>
<!-- Example format of the above value: ca-app-pub-9488501426181082~7319780494   -->
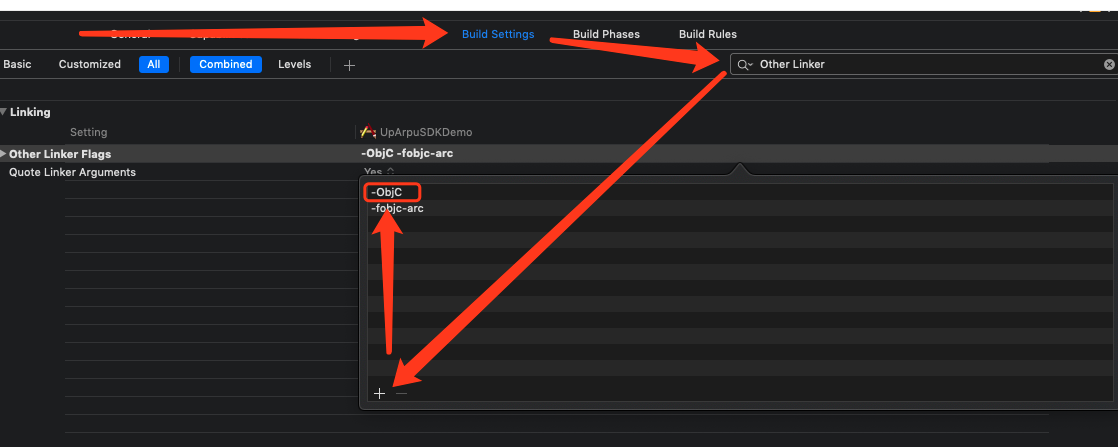
5.2 Set -ObjC
6. Import Android SDK
6.1 Register Plugin
Register the SDK plugin in the GeneratedPluginRegistrant class of the generated Android project:
public final class GeneratedPluginRegistrant {
  public static void registerWith(@NonNull FlutterEngine flutterEngine) {
    flutterEngine.getPlugins().add(new com.anythink.flutter.AnythinkSdkPlugin());
  }
}
6.2 Download and Import Android Native SDK
1. Go to the Official Website Download Page, select the platforms you need to integrate, and click download. After downloading, decompress the resulting Android SDK compressed package.
- (If there is a libs directory in the compressed package and there are files in the libs directory) Copy the libs directory from the Android SDK compressed package to the plugins/anythink_sdk/android/ directory, and add the following configuration in the project's build.gradle:
dependencies {
    api fileTree(dir: '<plugins>/android/libs', include: ['*.aar', '*.jar'])
}</plugins>
Note: Replace with the actual path where the anythink_sdk folder is placed in the project.
-
(If there is a build.gradle file in the compressed package) Copy the content from the compressed package's build.gradle into the project's build.gradle.
-
(If there is a res directory in the compressed package and there are files in the res directory) Copy the content from the res directory in the Android SDK compressed package correspondingly into the project's res directory.
7. Android Project Configuration
7.1 AndroidManifest Configuration
1. Add the content from the AndroidManifest.xml in the Android SDK compressed package to the AndroidManifest.xml in the project.
2. If Admob is integrated, the following configuration must be added to AndroidManifest.xml (the value should be configured with the ID of the app created in the Admob dashboard):
<manifest>
    <application>
        <!-- Sample AdMob App ID: ca-app-pub-3940256099942544~3347511713 -->
        <meta-data android:name="com.google.android.gms.ads.APPLICATION_ID" android:value="ca-app-pub-xxxxxxxxxxxxxxxx~yyyyyyyyyy"></meta-data>
    </application>
</manifest>
For details, see the Admob configuration documentation: Update your AndroidManifest.xml
7.2 Android 9 and Above Adaptation
Please refer to: Android Integration and Initialization
7.3 SDK Obfuscation Configuration
1. Flutter SDK obfuscation configuration
-keep public class com.anythink.flutter.**
-keepclassmembers class com.anythink.flutter.** {
   public *;
}
2. Android SDK ad platform obfuscation configuration
Please refer to the proguard-android.txt content in the Android SDK compressed package.
;}.cls-2{fill:%230868f7;}.cls-3{fill:url(%23未命名的渐变_44);}.cls-4{fill:%23333;}%3c/style%3e%3clinearGradient%20id='未命名的渐变_8'%20x1='33.73'%20y1='100.61'%20x2='-0.03'%20y2='-1.06'%20gradientUnits='userSpaceOnUse'%3e%3cstop%20offset='0'%20stop-color='%237ae9fb'/%3e%3cstop%20offset='0.67'%20stop-color='%232b90f8'/%3e%3cstop%20offset='1'%20stop-color='%230868f7'/%3e%3c/linearGradient%3e%3clinearGradient%20id='未命名的渐变_44'%20x1='27.86'%20y1='18.67'%20x2='68.36'%20y2='22.22'%20gradientUnits='userSpaceOnUse'%3e%3cstop%20offset='0'%20stop-color='%235ac7f2'/%3e%3cstop%20offset='1'%20stop-color='%230868f7'/%3e%3c/linearGradient%3e%3c/defs%3e%3cpath%20class='cls-1'%20d='M29,28.74V81.91l-9.51-3.68v0L8.52,74A7.17,7.17,0,0,1,4,67.32V24.54A3.76,3.76,0,0,1,9.08,21Z'/%3e%3cpath%20class='cls-2'%20d='M68.09,78.07a13.15,13.15,0,0,1-17.9,12.06L29,81.91h0V28.74L50.19,37A13.17,13.17,0,0,0,68.08,25.3h0Z'/%3e%3cpath%20class='cls-3'%20d='M68.08,25.3a13.19,13.19,0,0,1-6.73,10.87A13.09,13.09,0,0,1,50.19,37L29,28.74V6A3.76,3.76,0,0,1,34.1,2.52l25.59,9.91A13.22,13.22,0,0,1,68.08,25.3Z'/%3e%3cpath%20class='cls-4'%20d='M129.06,81.76a4.33,4.33,0,0,1-3.19-1.31,4.4,4.4,0,0,1-1.31-3.24V56.86H97.65V77.21a4.36,4.36,0,0,1-1.35,3.2A4.68,4.68,0,0,1,93,81.76a4.32,4.32,0,0,1-3.19-1.31,4.37,4.37,0,0,1-1.32-3.24V27.27A4.58,4.58,0,0,1,89.83,24a4.59,4.59,0,0,1,7.82,3.27V48.15h26.91V27.27A4.58,4.58,0,0,1,125.91,24a4.59,4.59,0,0,1,7.82,3.27V77.21a4.37,4.37,0,0,1-1.36,3.2A4.65,4.65,0,0,1,129.06,81.76Z'/%3e%3cpath%20class='cls-4'%20d='M163.77,81.66c-6.57,0-11.76-1.92-15.44-5.7s-5.54-9.07-5.54-15.74a26.76,26.76,0,0,1,2.09-10.43,17.72,17.72,0,0,1,6.67-8.06,19.15,19.15,0,0,1,10.68-2.95,19,19,0,0,1,10.46,2.8,18.7,18.7,0,0,1,6.55,7.36,22.53,22.53,0,0,1,2.36,10.28A4.51,4.51,0,0,1,177,63.77H152.23a10.8,10.8,0,0,0,3.49,6.65c2,1.68,4.88,2.52,8.66,2.52a22.25,22.25,0,0,0,7.54-1.21c.74-.3,1.55-.67,2.37-1.07a3.75,3.75,0,0,1,1.84-.4,4.09,4.09,0,0,1,3,1.15,4,4,0,0,1,1.12,3,4.38,4.38,0,0,1-2.58,3.82,32.34,32.34,0,0,1-6.36,2.61A28.67,28.67,0,0,1,163.77,81.66ZM172.4,55.9a9.72,9.72,0,0,0-1.63-4.56A9.9,9.9,0,0,0,167,48a10.38,10.38,0,0,0-4.64-1.14,12,12,0,0,0-4.77,1.06,9.54,9.54,0,0,0-4.89,5.66,11.78,11.78,0,0,0-.51,2.3Z'/%3e%3cpath%20class='cls-4'%20d='M193,81.64a4.49,4.49,0,0,1-4.51-4.55V27.28A4.58,4.58,0,0,1,189.84,24a4.48,4.48,0,0,1,3.28-1.36A4.36,4.36,0,0,1,196.35,24a4.46,4.46,0,0,1,1.31,3.31V77.09a4.34,4.34,0,0,1-1.35,3.2A4.67,4.67,0,0,1,193,81.64Z'/%3e%3cpath%20class='cls-4'%20d='M263.79,81.71a5.7,5.7,0,0,1-4.2-1.74,5.76,5.76,0,0,1-1.73-4.19V27.37a4.58,4.58,0,0,1,1.35-3.27A4.59,4.59,0,0,1,267,27.37V72.53h24a4.58,4.58,0,0,1,3.27,7.82A4.66,4.66,0,0,1,291,81.71Z'/%3e%3cpath%20class='cls-4'%20d='M424.48,81.74a4.71,4.71,0,0,1-2.71-.88,5.43,5.43,0,0,1-1-1l-.07-.09-12.41-17-5.41,5v9.44a4.31,4.31,0,0,1-1.36,3.19,4.66,4.66,0,0,1-3.3,1.36A4.29,4.29,0,0,1,395,80.42a4.36,4.36,0,0,1-1.32-3.23V27.37A4.58,4.58,0,0,1,395,24.1a4.52,4.52,0,0,1,6.58.12,4.54,4.54,0,0,1,1.24,3.15V56.31l17.72-16.38.05,0a4.8,4.8,0,0,1,2.94-1.11,4.4,4.4,0,0,1,3.27,1.2,4.57,4.57,0,0,1,1.2,3.27,4.44,4.44,0,0,1-.77,2.33,7.45,7.45,0,0,1-1.43,1.65l-11,9.64,13.34,17.68a5,5,0,0,1,1,2.71,4.12,4.12,0,0,1-1.36,3.24A4.64,4.64,0,0,1,424.48,81.74Z'/%3e%3cpath%20class='cls-4'%20d='M317.93,81.76a21.5,21.5,0,1,1,21.17-21.5A21.37,21.37,0,0,1,317.93,81.76Zm0-34.1a12.61,12.61,0,1,0,12.42,12.6A12.52,12.52,0,0,0,317.93,47.66Z'/%3e%3cpath%20class='cls-4'%20d='M212.18,101.22a4.12,4.12,0,0,1-3.05-1.26,4.17,4.17,0,0,1-1.26-3.1V43.34a4.37,4.37,0,0,1,1.3-3.14,4.26,4.26,0,0,1,3.13-1.3,4.19,4.19,0,0,1,3.1,1.26,4.32,4.32,0,0,1,1.26,3.16,20.77,20.77,0,0,1,13-4.54,21.51,21.51,0,0,1,0,43,20.51,20.51,0,0,1-13-4.57V96.86a4.15,4.15,0,0,1-1.3,3.06A4.5,4.5,0,0,1,212.18,101.22Zm17.43-53.63c-6.23,0-12.93,4.11-12.93,12.72a12.73,12.73,0,0,0,25.46,0A12.71,12.71,0,0,0,229.61,47.59Z'/%3e%3cpath%20class='cls-4'%20d='M365.76,81.76a21.5,21.5,0,1,1,21.18-21.5A21.37,21.37,0,0,1,365.76,81.76Zm0-34.1a12.61,12.61,0,1,0,12.42,12.6A12.52,12.52,0,0,0,365.76,47.66Z'/%3e%3c/svg%3e)