
Testing tools (Beta)
Notes:
- Supports developers to use for detection after integrating Taku SDK
- The test tool is only for checking SDK integration and cannot replace the app's own ad logic testing
- Developers should delete the code that calls the test tool before going live after testing is complete
- Version requirements: Android (v6.2.78 and above), iOS (v6.2.78 and above)
1. Product Introduction
Improve the efficiency of developer integration testing by using the test tool:
- Basic Info: Check application, device, and SDK related information
- Taku SDK Settings: Check whether privacy settings and permissions are successfully configured
- Integration Check: Check the integration status of third-party platform SDKs and adapters, testing suggestions, and test ad loading for third-party ad platforms
Version Description
2. Integration Process
Note: Before integrating the test tool, you need to integrate the Taku SDK first. For SDK integration methods, see the Unity Plugin Usage Instructions.
Android Integration Process
-
Import the test tool's dependency library by following these two steps:
Step 1: First, create a folder named Editor in the Unity project/Assets/AnyThinkAds/Plugins/Android directory;
Step 2: Create a Dependencies.xml file, add the following content to the file, and then place it in the Editor directory created in Step 1.<dependencies> <androidPackages> <repositories> <repository>https://jfrog.anythinktech.com/artifactory/debugger</repository> </repositories> <androidPackage spec="com.anythink.sdk:debugger-ui:1.1.2"/> </androidPackages> </dependencies>Note: The folder in Step 1 must be named Editor, and the file in Step 2 must be named Dependencies.xml.
-
After completing the import of the test tool's dependency library, you can directly call the C# API in the Unity layer. First call SDK Initialization, then call the following method to navigate to the test tool page:
//Debug Key: To obtain it, go to Log in to the dashboard -> Account Management -> Key -> SDK Debug Key
ATSDKAPI.showDebuggerUI("Your Debug Key");
Note: You must initialize the SDK first before navigating to the test tool page.
iOS Integration Process
-
Import the test tool's dependency library by following these two steps:
Step 1: First, create a folder named Editor in the Unity project/Assets/AnyThinkAds/Plugins/iOS directory;
Step 2: Create a Dependencies.xml file, add the following content to the file, and then place it in the Editor directory created in Step 1.<?xml version="1.0" encoding="utf-8"?> <dependencies> <iosPods> <iosPod name="AnyThinkDebugUISDK" version="1.0.3" /> </iosPods> </dependencies>Note: The folder in Step 1 must be named Editor, and the file in Step 2 must be named Dependencies.xml.
-
After completing the import of the test tool's dependency library, you can directly call the C# API in the Unity layer. First call SDK Initialization, then call the following method to navigate to the test tool page:
//Debug Key: To obtain it, go to Log in to the dashboard -> Account Management -> Key -> SDK Debug Key
ATSDKAPI.showDebuggerUI("Your Debug Key");
Note:
a. You must initialize the SDK first before navigating to the test tool page.
b. The features in the test tool also require the app side to obtain IDFA first before they can be used. Currently, SDK Initialization does not obtain IDFA.
Note: Before going live, you need to delete the code that calls the test tool.
3. Test Tool Usage
- Basic Info
Features: Supports long press to copy information and share current page data.
Android Basic Info
-
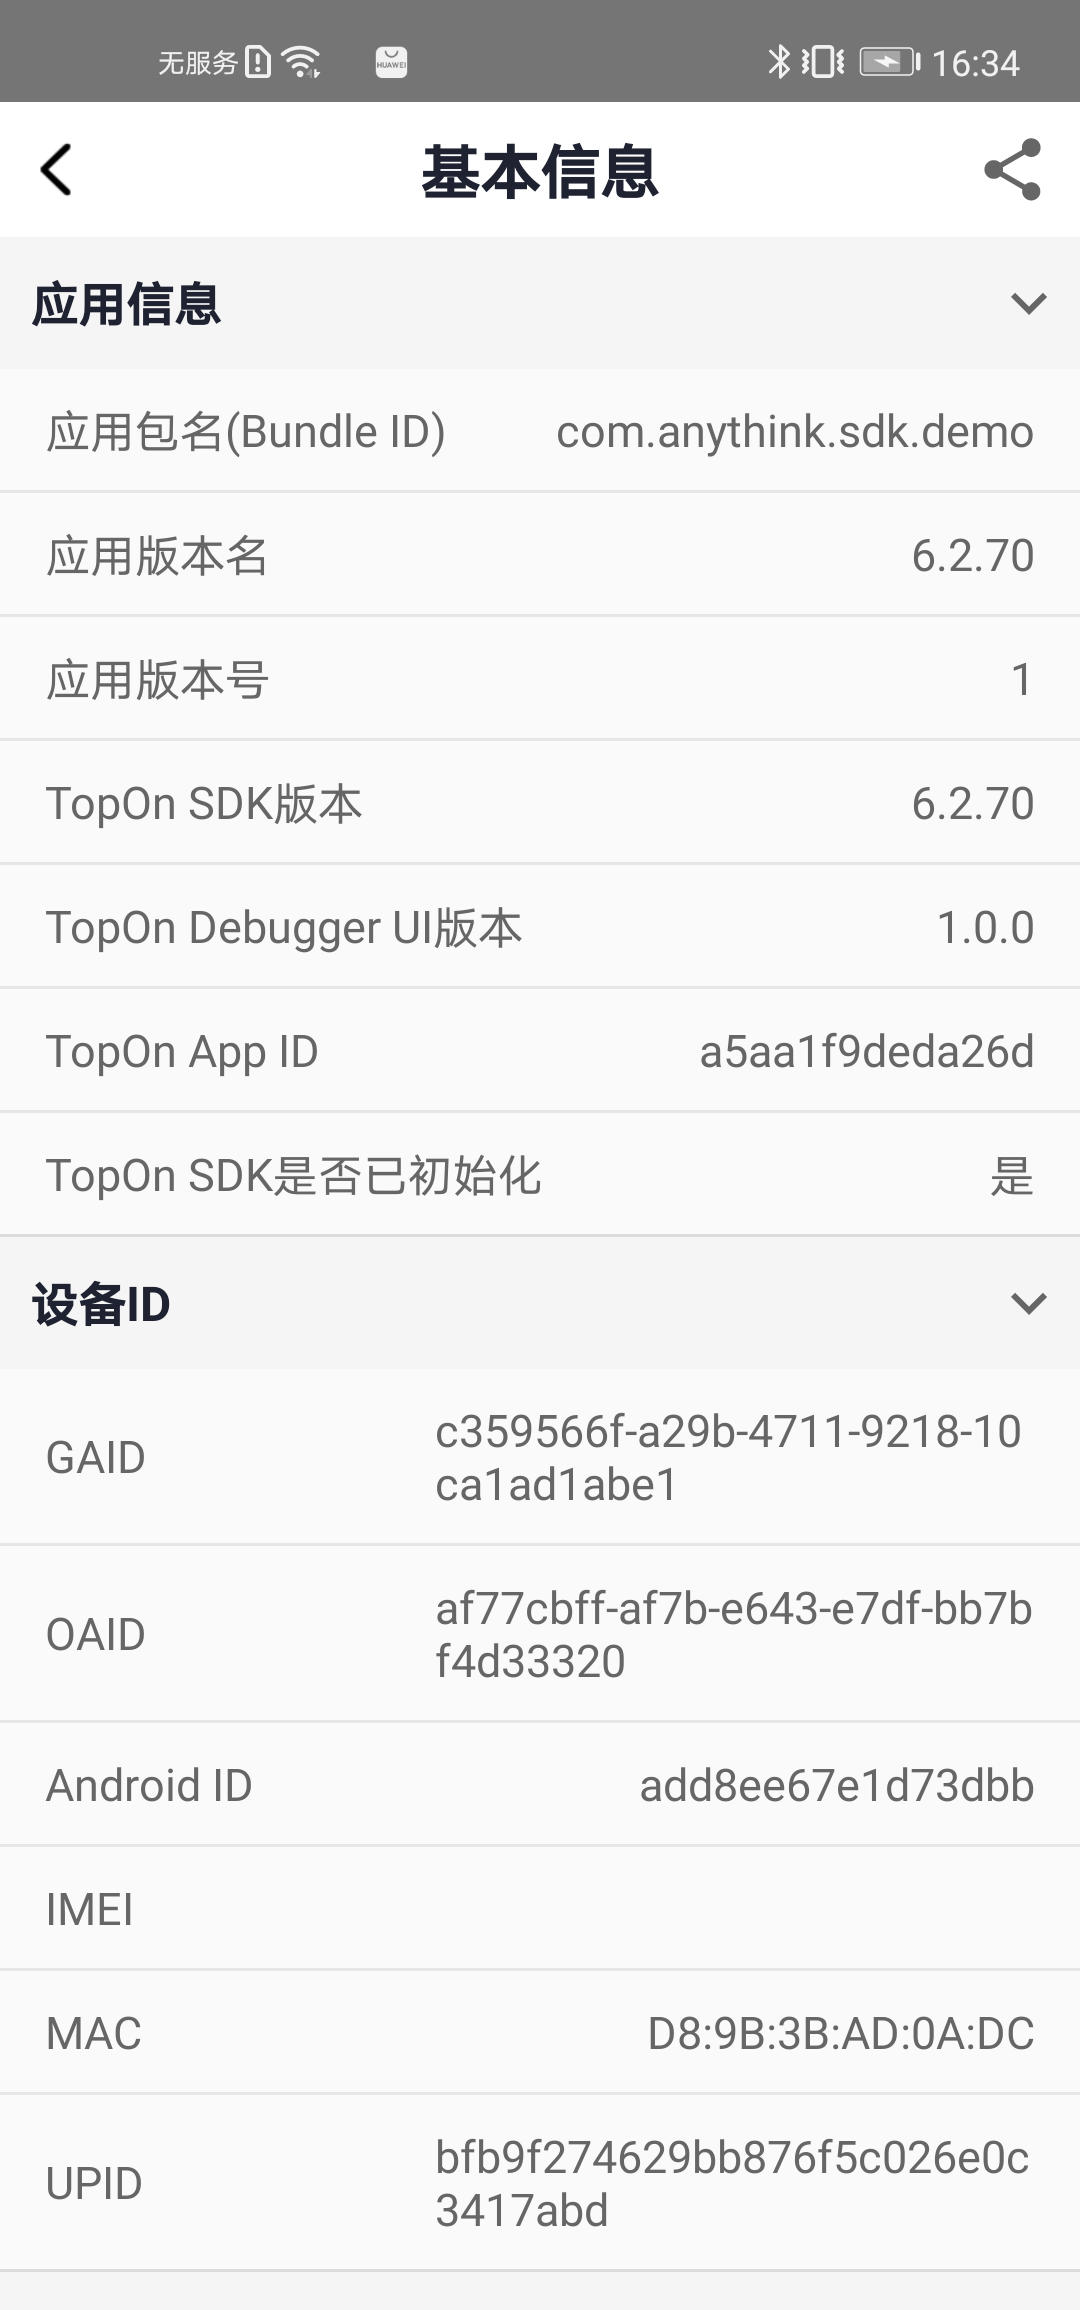
GAID is the Google Advertising ID. If GAID is displayed as empty, please check the following factors:
- Whether the phone has Google services.
- Whether the following method was called before entering this page to restrict GAID acquisition.
string[] deniedInfos = new string[] { "gaid" }; ATSDKAPI.deniedUploadDeviceInfo(deniedInfos); -
Android ID is a device unique identifier. If AndroidId is displayed as empty, please check whether the following method was called to restrict AndroidId acquisition:
string[] deniedInfos = new string[] { "android_id" }; ATSDKAPI.deniedUploadDeviceInfo(deniedInfos); -
Note: If the integrated SDK is an overseas SDK, enabling the debug mode below requires GAID not to be empty. If it is a domestic SDK, AndroidId must not be empty.
iOS Basic Info
- IDFA is a device unique identifier. If IDFA is displayed as empty, please check whether the tracking permission has been granted.
- Note: If IDFA is empty, ad debugging cannot be successfully enabled. Please grant tracking permission in Settings.
- Taku SDK Settings
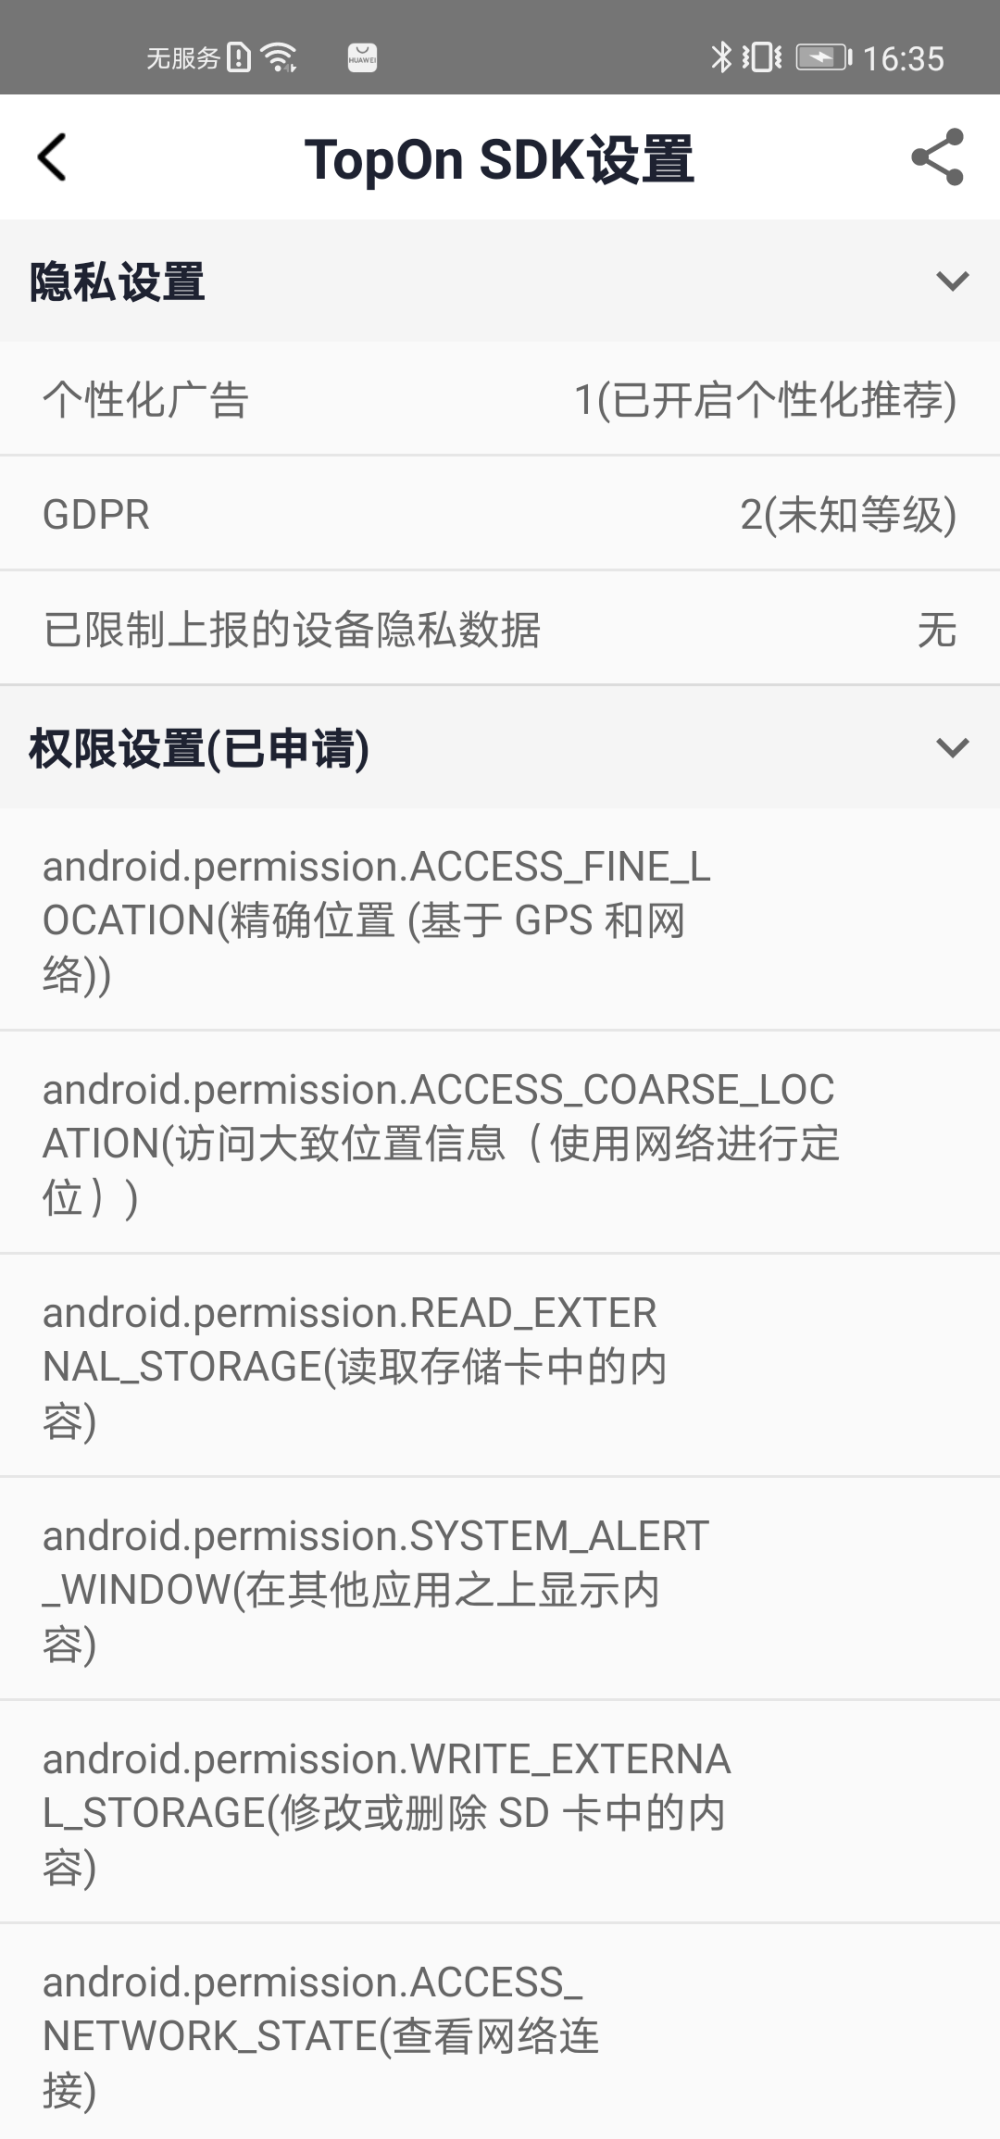
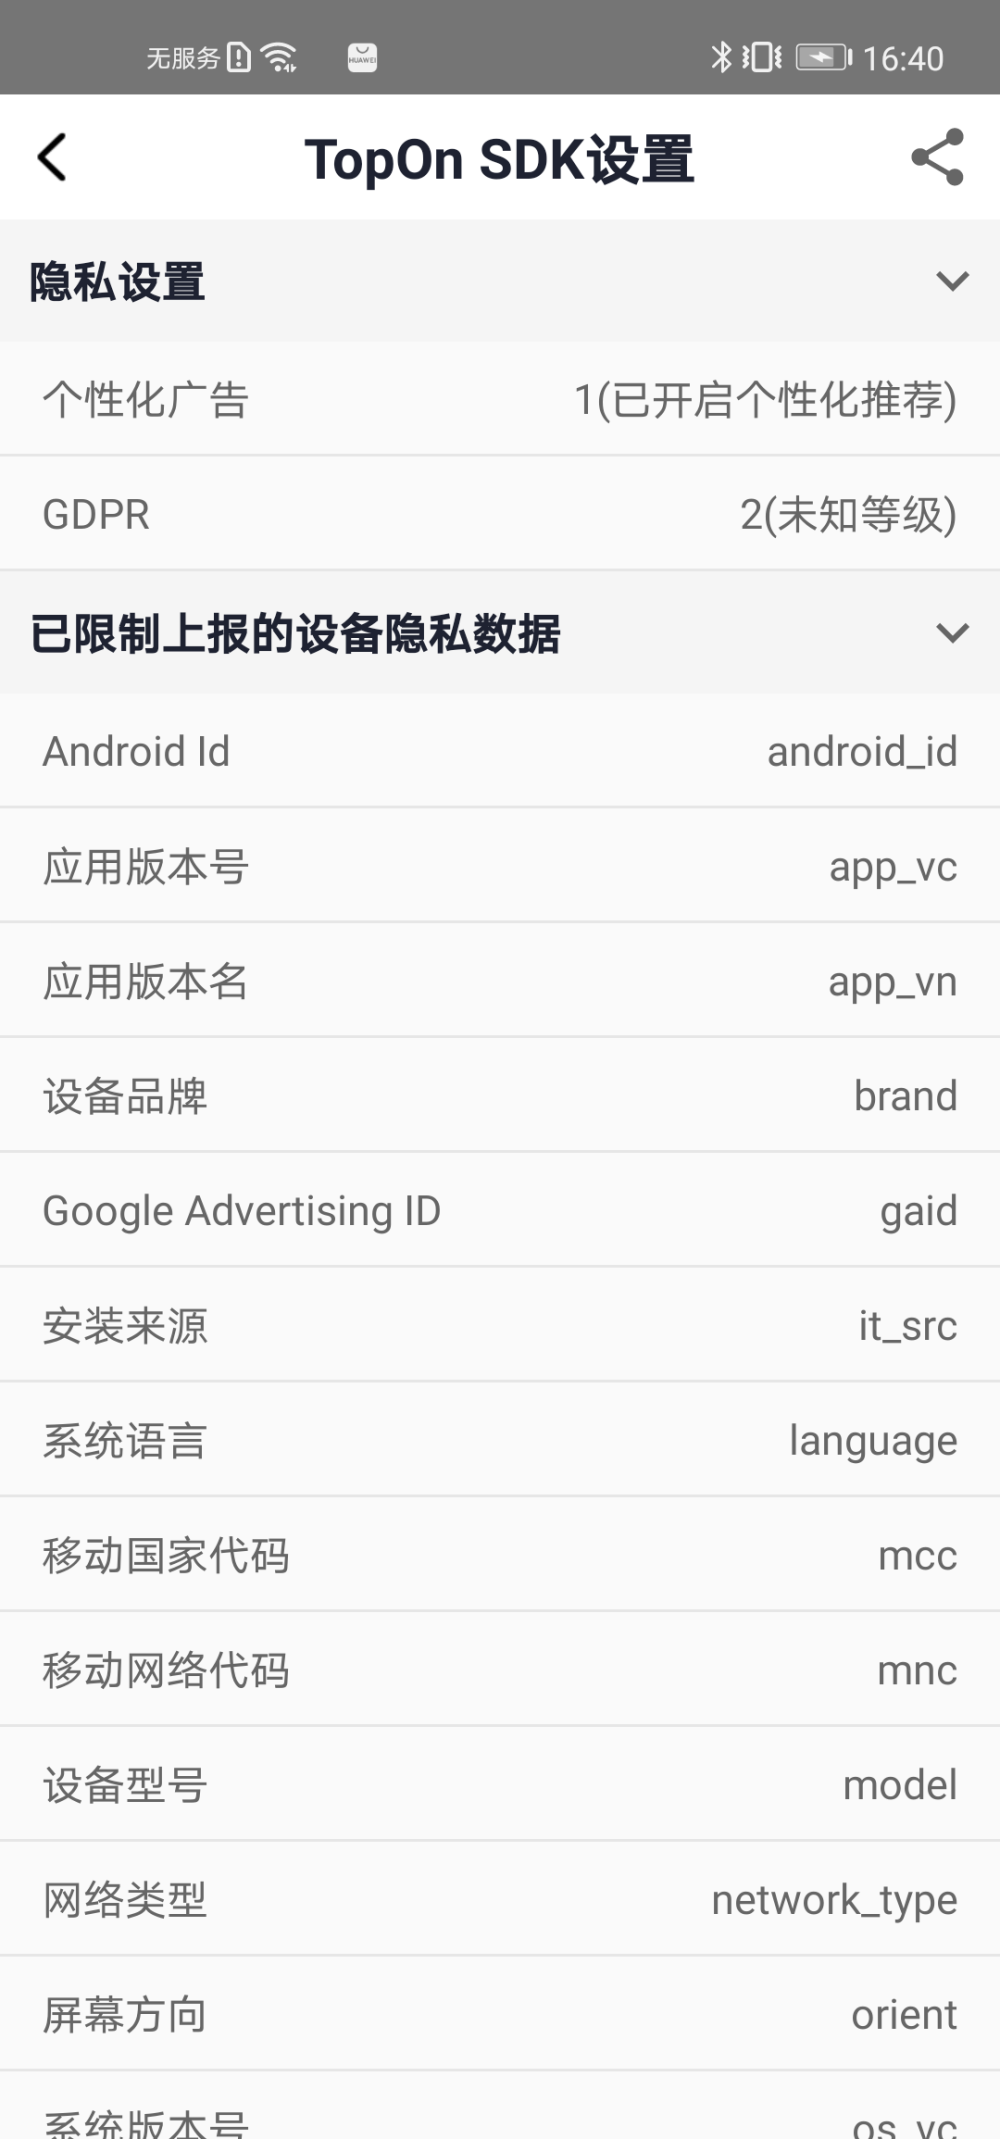
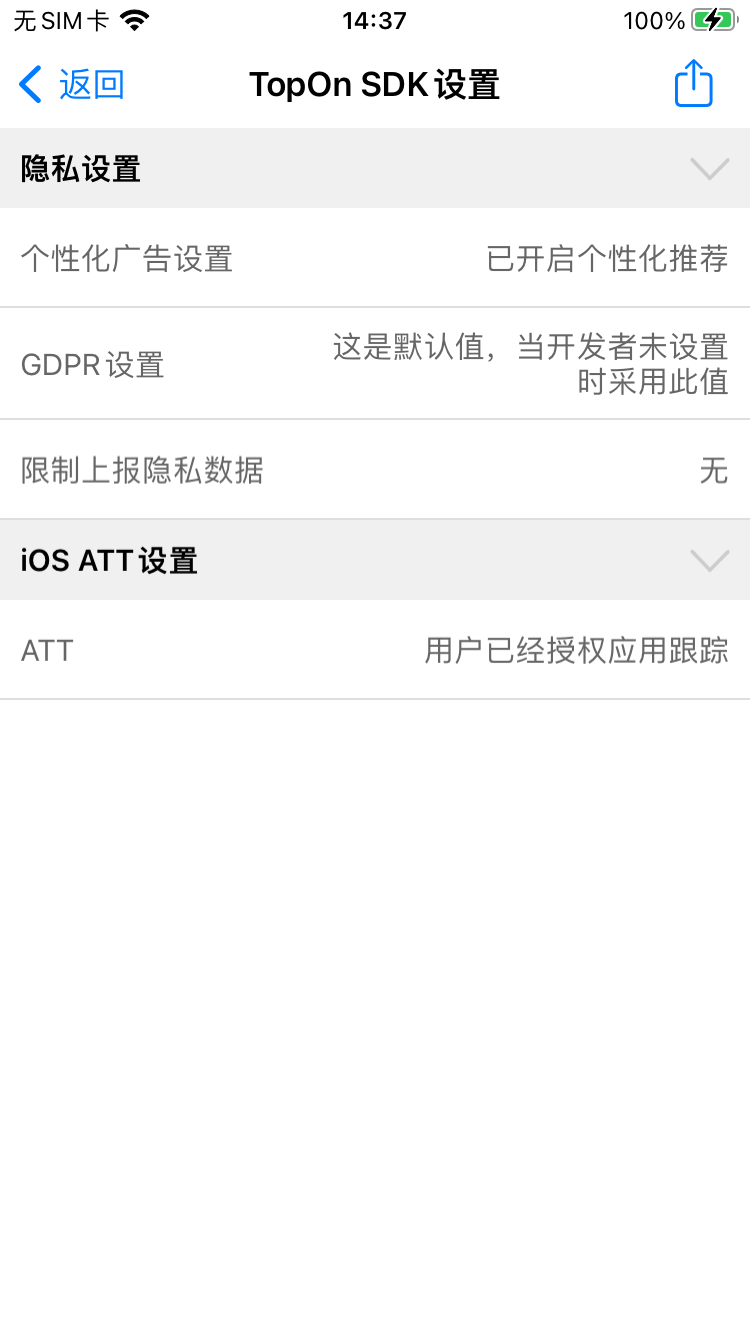
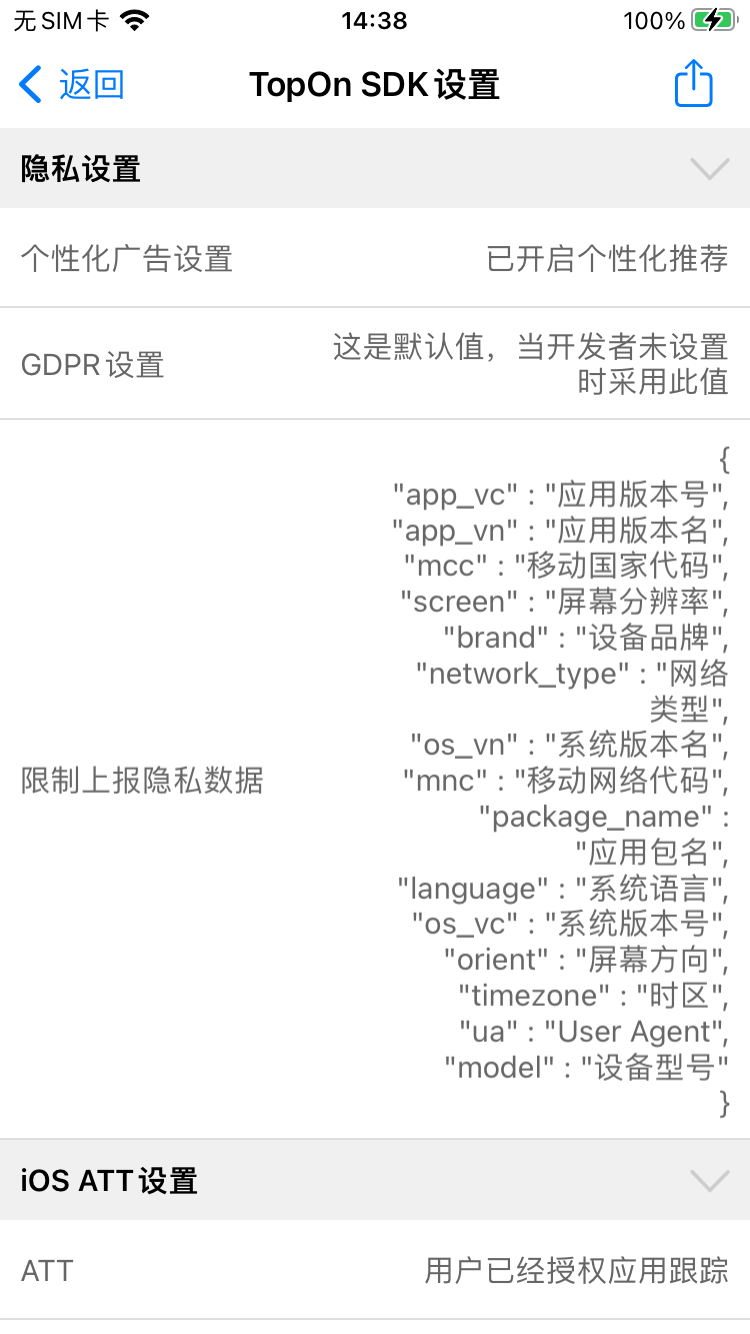
Taku SDK Settings consist of two parts: Privacy Settings and Permission Settings.
- Privacy Settings
Domestic: There are personalized ad recommendation switches and privacy information control switches. Setup method: Export to Android and iOS native projects from Unity respectively for setup. For details, see Android Domestic Privacy Configuration and iOS Domestic Privacy Configuration.
Overseas: Set GDPR. Setup method: 1. Supported to set directly in Unity, click to view; 2. Export to Android and iOS native projects for setup. For details, see Android GDPR Settings and iOS GDPR Settings. - Permission Settings: List of permissions requested by the app.
- Android Page
- iOS Page
- Integration Check
- View the integration status of the ad platform list: Integration Abnormal, Integrated, Not Integrated.
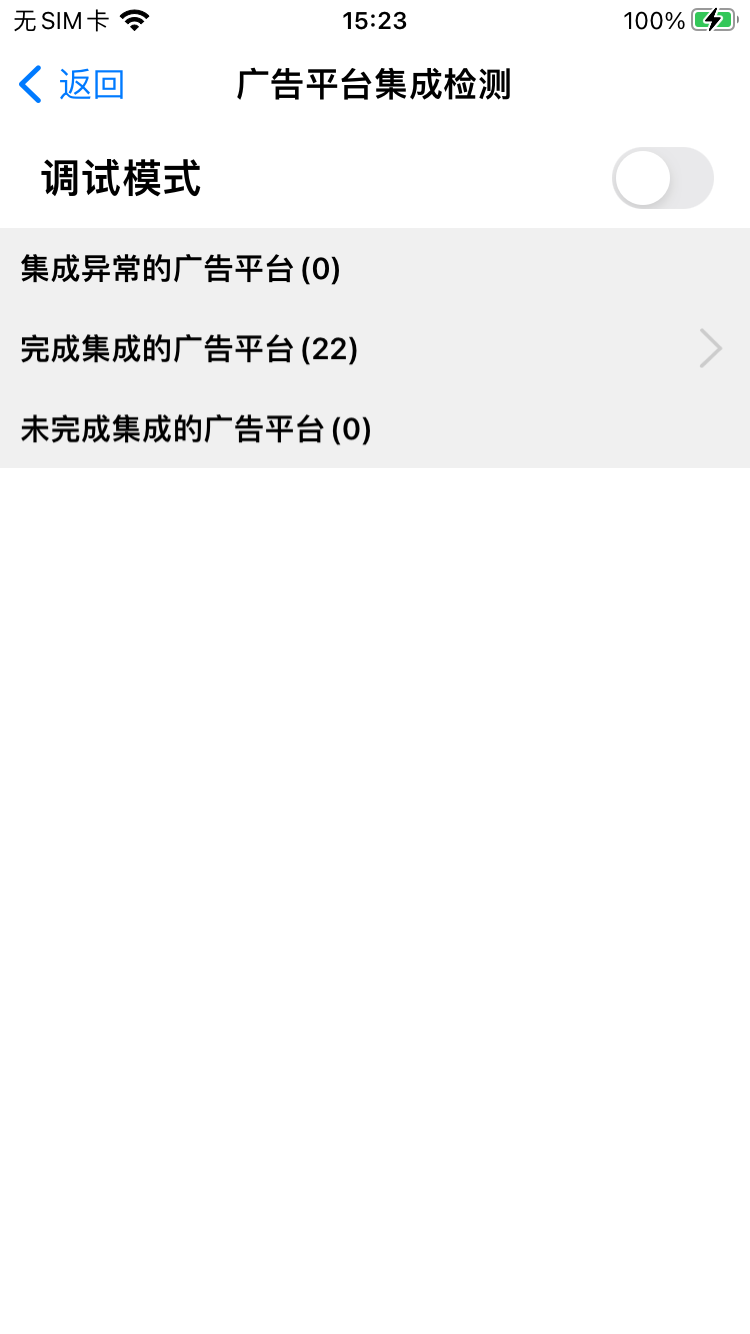
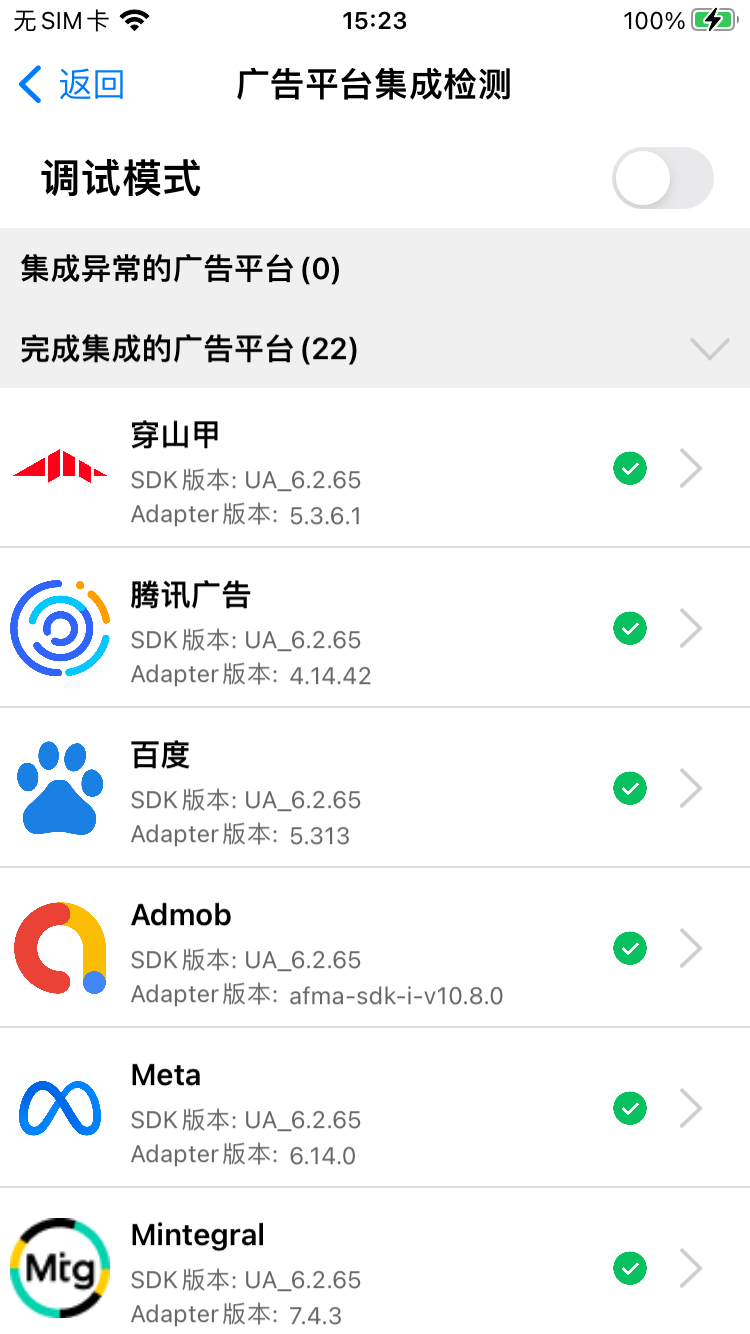
- Check the switch to enable debug mode.
- Select an integrated ad platform to enter Debug Mode.
- Select the ad platform's ad format for testing operations.
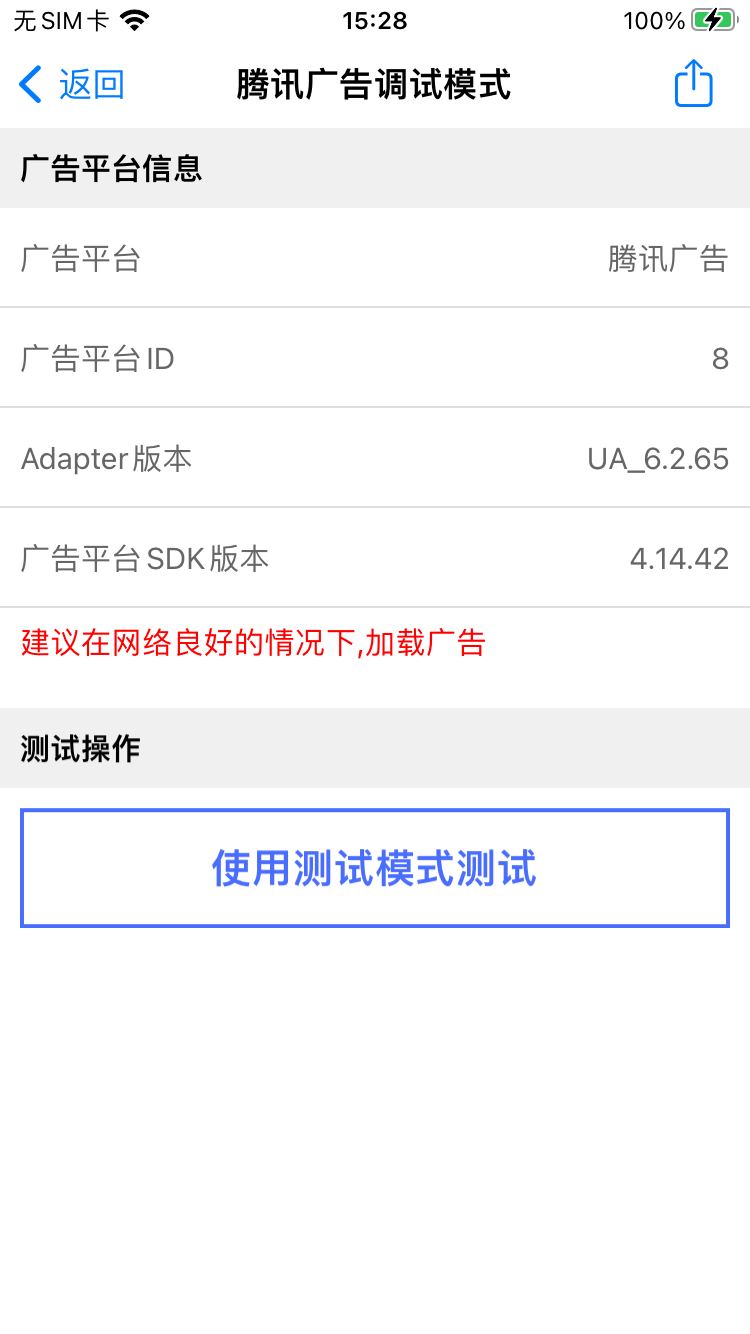
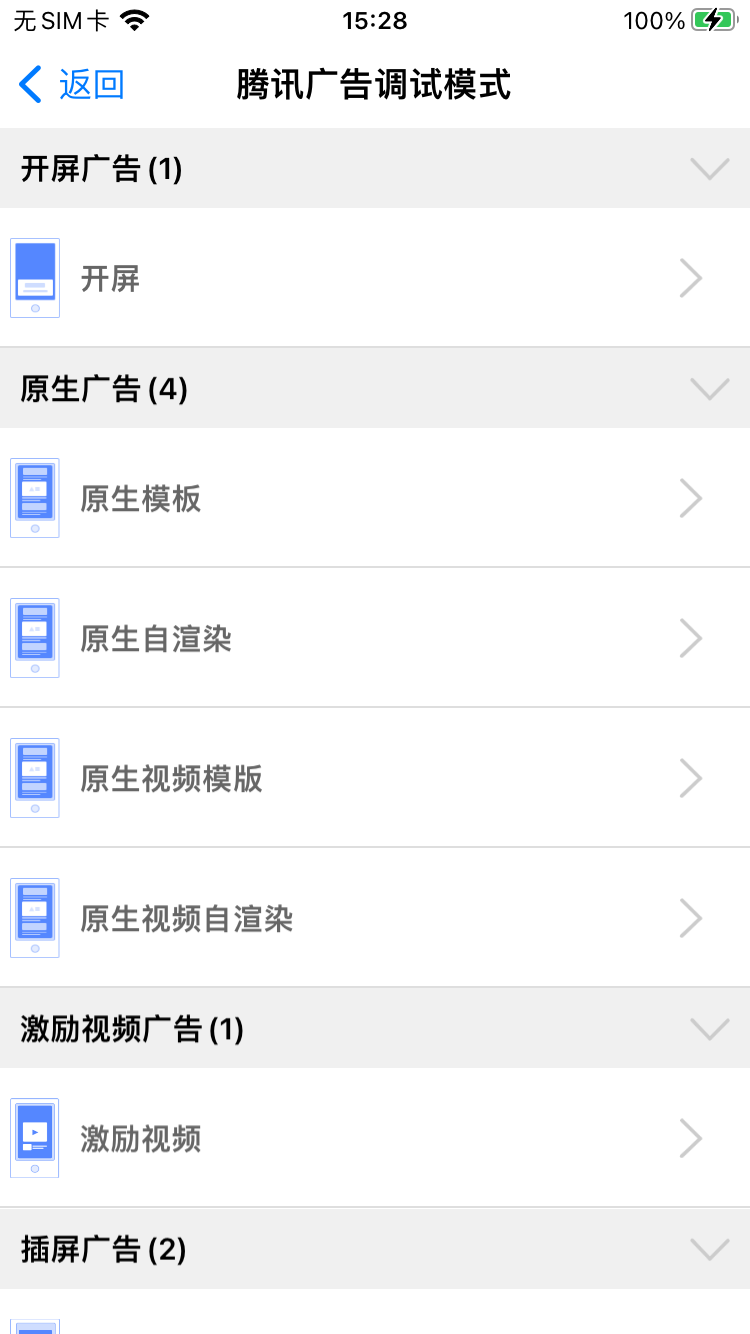
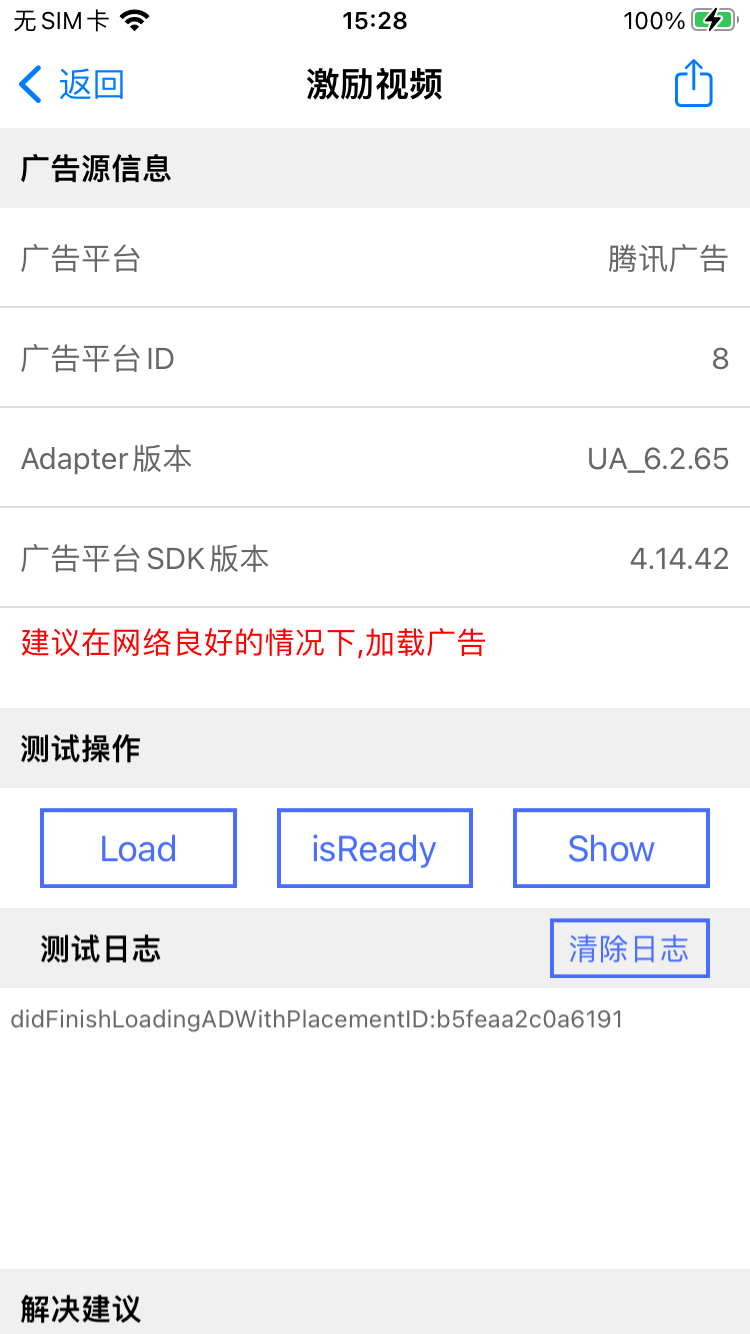
- You can click the share button in the upper right corner to share the current page's ad platform debugging information.
;}.cls-2{fill:%230868f7;}.cls-3{fill:url(%23未命名的渐变_44);}.cls-4{fill:%23333;}%3c/style%3e%3clinearGradient%20id='未命名的渐变_8'%20x1='33.73'%20y1='100.61'%20x2='-0.03'%20y2='-1.06'%20gradientUnits='userSpaceOnUse'%3e%3cstop%20offset='0'%20stop-color='%237ae9fb'/%3e%3cstop%20offset='0.67'%20stop-color='%232b90f8'/%3e%3cstop%20offset='1'%20stop-color='%230868f7'/%3e%3c/linearGradient%3e%3clinearGradient%20id='未命名的渐变_44'%20x1='27.86'%20y1='18.67'%20x2='68.36'%20y2='22.22'%20gradientUnits='userSpaceOnUse'%3e%3cstop%20offset='0'%20stop-color='%235ac7f2'/%3e%3cstop%20offset='1'%20stop-color='%230868f7'/%3e%3c/linearGradient%3e%3c/defs%3e%3cpath%20class='cls-1'%20d='M29,28.74V81.91l-9.51-3.68v0L8.52,74A7.17,7.17,0,0,1,4,67.32V24.54A3.76,3.76,0,0,1,9.08,21Z'/%3e%3cpath%20class='cls-2'%20d='M68.09,78.07a13.15,13.15,0,0,1-17.9,12.06L29,81.91h0V28.74L50.19,37A13.17,13.17,0,0,0,68.08,25.3h0Z'/%3e%3cpath%20class='cls-3'%20d='M68.08,25.3a13.19,13.19,0,0,1-6.73,10.87A13.09,13.09,0,0,1,50.19,37L29,28.74V6A3.76,3.76,0,0,1,34.1,2.52l25.59,9.91A13.22,13.22,0,0,1,68.08,25.3Z'/%3e%3cpath%20class='cls-4'%20d='M129.06,81.76a4.33,4.33,0,0,1-3.19-1.31,4.4,4.4,0,0,1-1.31-3.24V56.86H97.65V77.21a4.36,4.36,0,0,1-1.35,3.2A4.68,4.68,0,0,1,93,81.76a4.32,4.32,0,0,1-3.19-1.31,4.37,4.37,0,0,1-1.32-3.24V27.27A4.58,4.58,0,0,1,89.83,24a4.59,4.59,0,0,1,7.82,3.27V48.15h26.91V27.27A4.58,4.58,0,0,1,125.91,24a4.59,4.59,0,0,1,7.82,3.27V77.21a4.37,4.37,0,0,1-1.36,3.2A4.65,4.65,0,0,1,129.06,81.76Z'/%3e%3cpath%20class='cls-4'%20d='M163.77,81.66c-6.57,0-11.76-1.92-15.44-5.7s-5.54-9.07-5.54-15.74a26.76,26.76,0,0,1,2.09-10.43,17.72,17.72,0,0,1,6.67-8.06,19.15,19.15,0,0,1,10.68-2.95,19,19,0,0,1,10.46,2.8,18.7,18.7,0,0,1,6.55,7.36,22.53,22.53,0,0,1,2.36,10.28A4.51,4.51,0,0,1,177,63.77H152.23a10.8,10.8,0,0,0,3.49,6.65c2,1.68,4.88,2.52,8.66,2.52a22.25,22.25,0,0,0,7.54-1.21c.74-.3,1.55-.67,2.37-1.07a3.75,3.75,0,0,1,1.84-.4,4.09,4.09,0,0,1,3,1.15,4,4,0,0,1,1.12,3,4.38,4.38,0,0,1-2.58,3.82,32.34,32.34,0,0,1-6.36,2.61A28.67,28.67,0,0,1,163.77,81.66ZM172.4,55.9a9.72,9.72,0,0,0-1.63-4.56A9.9,9.9,0,0,0,167,48a10.38,10.38,0,0,0-4.64-1.14,12,12,0,0,0-4.77,1.06,9.54,9.54,0,0,0-4.89,5.66,11.78,11.78,0,0,0-.51,2.3Z'/%3e%3cpath%20class='cls-4'%20d='M193,81.64a4.49,4.49,0,0,1-4.51-4.55V27.28A4.58,4.58,0,0,1,189.84,24a4.48,4.48,0,0,1,3.28-1.36A4.36,4.36,0,0,1,196.35,24a4.46,4.46,0,0,1,1.31,3.31V77.09a4.34,4.34,0,0,1-1.35,3.2A4.67,4.67,0,0,1,193,81.64Z'/%3e%3cpath%20class='cls-4'%20d='M263.79,81.71a5.7,5.7,0,0,1-4.2-1.74,5.76,5.76,0,0,1-1.73-4.19V27.37a4.58,4.58,0,0,1,1.35-3.27A4.59,4.59,0,0,1,267,27.37V72.53h24a4.58,4.58,0,0,1,3.27,7.82A4.66,4.66,0,0,1,291,81.71Z'/%3e%3cpath%20class='cls-4'%20d='M424.48,81.74a4.71,4.71,0,0,1-2.71-.88,5.43,5.43,0,0,1-1-1l-.07-.09-12.41-17-5.41,5v9.44a4.31,4.31,0,0,1-1.36,3.19,4.66,4.66,0,0,1-3.3,1.36A4.29,4.29,0,0,1,395,80.42a4.36,4.36,0,0,1-1.32-3.23V27.37A4.58,4.58,0,0,1,395,24.1a4.52,4.52,0,0,1,6.58.12,4.54,4.54,0,0,1,1.24,3.15V56.31l17.72-16.38.05,0a4.8,4.8,0,0,1,2.94-1.11,4.4,4.4,0,0,1,3.27,1.2,4.57,4.57,0,0,1,1.2,3.27,4.44,4.44,0,0,1-.77,2.33,7.45,7.45,0,0,1-1.43,1.65l-11,9.64,13.34,17.68a5,5,0,0,1,1,2.71,4.12,4.12,0,0,1-1.36,3.24A4.64,4.64,0,0,1,424.48,81.74Z'/%3e%3cpath%20class='cls-4'%20d='M317.93,81.76a21.5,21.5,0,1,1,21.17-21.5A21.37,21.37,0,0,1,317.93,81.76Zm0-34.1a12.61,12.61,0,1,0,12.42,12.6A12.52,12.52,0,0,0,317.93,47.66Z'/%3e%3cpath%20class='cls-4'%20d='M212.18,101.22a4.12,4.12,0,0,1-3.05-1.26,4.17,4.17,0,0,1-1.26-3.1V43.34a4.37,4.37,0,0,1,1.3-3.14,4.26,4.26,0,0,1,3.13-1.3,4.19,4.19,0,0,1,3.1,1.26,4.32,4.32,0,0,1,1.26,3.16,20.77,20.77,0,0,1,13-4.54,21.51,21.51,0,0,1,0,43,20.51,20.51,0,0,1-13-4.57V96.86a4.15,4.15,0,0,1-1.3,3.06A4.5,4.5,0,0,1,212.18,101.22Zm17.43-53.63c-6.23,0-12.93,4.11-12.93,12.72a12.73,12.73,0,0,0,25.46,0A12.71,12.71,0,0,0,229.61,47.59Z'/%3e%3cpath%20class='cls-4'%20d='M365.76,81.76a21.5,21.5,0,1,1,21.18-21.5A21.37,21.37,0,0,1,365.76,81.76Zm0-34.1a12.61,12.61,0,1,0,12.42,12.6A12.52,12.52,0,0,0,365.76,47.66Z'/%3e%3c/svg%3e)